Monday, January 22, 2024

Which JRE or JDK am I using?

Here are some examples using which you can get java versions on linux systems:

  • java -version
  • java -XshowSettings:properties -version
  • ls -l $(which java)
  • ll /usr/lib/java*
  • ls -l /etc/alternatives/java
  • dirname $(readlink -f $(which java))
  • alternatives --display java
  • rpm -qa | grep jdk
  • ll /usr/lib/j*

Thursday, January 18, 2024

.Xauthority does not exist


The "Xauthority does not exist" error typically occurs in Unix-like systems when attempting to start an X Window System session, and the X authority file (`.Xauthority`) cannot be found or accessed.

Here are a few steps to address this issue:

1. Check for the Existence of .Xauthority:

   Ensure that the `.Xauthority` file exists in the home directory of the user attempting to start the X session. You can check using the following command:

---------------------------------------------------------------------------------

   ls -la ~/.Xauthority

---------------------------------------------------------------------------------

   If the file doesn't exist, it may need to be created.

2. Create .Xauthority File:

   If the `.Xauthority` file is missing, you can create it using the following command:

---------------------------------------------------------------------------------

   touch ~/.Xauthority

---------------------------------------------------------------------------------

   If it still doesn't exist or there are permission issues, you can try to recreate it by running the following commands:

---------------------------------------------------------------------------------

   xauth generate :0 . trusted

---------------------------------------------------------------------------------

3. Check Permissions:

   Ensure that the user has the correct permissions for the `.Xauthority` file. The file should be owned by the user, and the user should have read and write permissions. You can adjust the permissions using the `chmod` command:

---------------------------------------------------------------------------------

   chmod 600 ~/.Xauthority

---------------------------------------------------------------------------------

4. Ensure xauth Package is Installed:

   In some cases, the `xauth` package may not be installed. Install it using the package manager specific to your distribution. For example, on Debian/Ubuntu-based systems, you can use:

---------------------------------------------------------------------------------

   sudo apt-get install xauth

---------------------------------------------------------------------------------

5. Check for Disk Space:

   Ensure that there is sufficient disk space on the system. A lack of disk space could potentially prevent the creation or access of the `.Xauthority` file.

6. Check for Multiple Users:

   If you are switching between users, make sure that you have proper permissions and that the `.Xauthority` file is accessible to both users.

After performing these steps, try restarting the X session or running the X application again. If the problem persists, there may be specific details about your system configuration or usage scenario that need further investigation.

The `.Xauthority` file plays a crucial role in X Window System (X11) sessions on Unix-like operating systems. Its primary purpose is to manage authorization and security for X client-server communication. Here's a breakdown of its significance:

1. Authorization:

   -- When an X client (an application that displays its user interface using X11) attempts to connect to an X server (a program that manages the display), the server needs to authenticate the client's identity.

   -- The `.Xauthority` file stores authorization data that allows X clients to prove their identity to the X server.

2. Security:

   -- The X Window System relies on a client-server model where X clients request services (e.g., displaying windows) from an X server.

   -- To prevent unauthorized access to the X server, the `.Xauthority` file ensures that only authorized clients can connect to the server.

3. Cookie-Based Authentication:

   -- The `.Xauthority` file contains "cookies," which are random data strings shared between the X server and authorized X clients.

   -- When a client attempts to connect, it provides the server with its cookie. If the cookie matches the entry in the `.Xauthority` file, the connection is authenticated.

4. Per-User Basis:

   -- Each user has their own `.Xauthority` file located in their home directory (`~`). This ensures that authorization information is kept separate for each user.

5. Dynamic Generation:

   -- The `.Xauthority` file is typically dynamically generated and managed by the `xauth` utility. The `xauth` command allows users to view, add, and remove entries in the `.Xauthority` file.

In summary, the `.Xauthority` file is a key component in the X11 security model, providing a mechanism for authenticating X clients and ensuring secure communication between clients and servers. It helps prevent unauthorized access to the graphical user interface and contributes to the overall security of X Window System sessions on Unix-like systems.

Friday, December 22, 2023

Difference between #BIOS and #UEFI for someone new to computers:


BIOS stands for Basic Input/Output System. It's like the computer's first language—it tells your computer how to start up when you press the power button. It's been around for a long time and works with older systems. Imagine it as an old, reliable but somewhat limited way of starting your computer.

UEFI stands for Unified Extensible Firmware Interface. It's like a newer and more versatile version of BIOS. UEFI does the same job as BIOS but in a more modern way. It's like upgrading from an older phone to a newer one with better features. UEFI is more flexible, faster, and can handle bigger and newer hard drives.

One key difference is that BIOS uses a simple text-based interface, while UEFI has a graphical interface that's easier to navigate. Also, UEFI supports more security features, like Secure Boot, which helps protect your computer from certain types of malware during startup.

So, think of BIOS as the old but reliable way your computer starts up, and UEFI as the newer, more advanced method that offers better features and security.

Thursday, December 21, 2023

How to i see list of only file and sort by type and see count of each type of files

find . -type f -printf "%f\n" | awk -F. '{print $NF}' | sort | uniq -c

  • find . -type f -printf "%f\n": This finds all files (-type f) in the current directory (.) and prints only their names (%f) followed by a newline.
  • awk -F. '{print $NF}': This uses awk to extract the file extensions by splitting each filename at the dot (.) and printing the last field ($NF).
  • sort: This sorts the file extensions alphabetically.
  • uniq -c: This counts the occurrences of each unique file extension.

This command will output a list showing the count of each file type in the current directory. Adjust the starting directory in the find command (. in this example) if you want to search in a different directory.

Display both head and tail of a file or a ls command output or anyother command

Following Commands will basically show head and tail of a command or a file at once, basically it will sho the start and end of a file or a command.

Combining head and tail using cat

    cat filename | head && echo "..." && cat filename | tail

Using sed command to display both head and tail:

    sed -n -e '1,10p' -e '$p' filename

To view both the head and tail of the output from an ls command, you can combine head and tail commands together with a pipe (|) to display both at the same time.

    ls -l | { head; echo "..."; tail; }

    ls -l > temp_file && { head temp_file; echo "..."; tail temp_file; } && rm temp_file


Wednesday, November 29, 2023

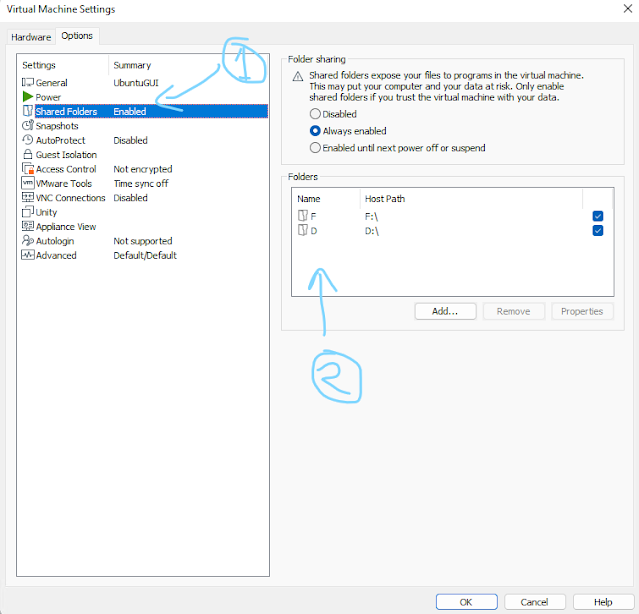
Unable to see #shared #folders in #Ubuntu in #Vmware #VirtualMachine

Make sure you have enabled the shared folder in vmware settings as follows:

Vmware ubuntu shared folder

Run following command on terminal:

sudo mkdir -p /mnt/hgfs/
sudo /usr/bin/vmhgfs-fuse .host:/ /mnt/hgfs/ -o subtype=vmhgfs-fuse,allow_other

Open /etc/fstab 

sudo vim /etc/fstab


Add following line at end of the file(Be carefull while modifying system files, always create a backup copy before modifying it)

vmhgfs-fuse   /mnt/hgfs    fuse    defaults,allow_other    0    0

Then run command 

sudo mount -a


For more detils you can visit: 


What is the difference between `` $() and ${} in shell programming linux?


In shell scripting on Linux (or Unix-like systems), both `` `...` `` (backticks) and `${}` are used for different purposes.

1. --Backticks: `` `...` `` or `$(...)`:--

   - They're used for command substitution in shell scripts. Whatever is enclosed within backticks or within `$(...)` will be treated as a command and the output of that command will replace the backticks or `$()`.

   - For instance:

     ```bash

     current_date=`date +%Y-%m-%d`

     # or

     current_date=$(date +%Y-%m-%d)

     ```

     Both of these lines will store the current date in the `current_date` variable using command substitution.

2. --Curly Braces with Variables: `${var}` or `$var`:--

   - They're used for variable expansion and manipulation. `${}` is used to explicitly denote the boundaries of a variable name. This allows for more precise variable identification in certain cases and also enables performing operations on the variable value.

   - For example:

     ```bash

     var=10

     echo "Value of var is ${var}"

     ```

     This prints the value of the `var` variable enclosed within curly braces.

The main difference lies in their purposes: backticks or `$()` for command substitution, while `${}` for variable expansion and manipulation. The use of `${}` can also allow for additional functionalities like performing operations on variables or ensuring the variable name boundaries.

Difference between `` and $()

Both `` `...` `` (backticks) and `$(...)` have the same purpose: command substitution in shell scripting. However, using `$(...)` for command substitution is generally preferred over backticks for several reasons:


1. --Readability:--

   - `$(...)` is more readable and distinguishable, especially in complex commands or when nested. The backticks can sometimes be hard to spot and can be confused with single quotes.


2. --Nested Substitutions:--

   - `$(...)` allows easier nesting of command substitutions within other substitutions. Nesting backticks can become visually confusing.


3. --Escape Characters:--

   - Within backticks, you might need to escape certain characters, while `$(...)` often requires fewer escape characters and is more consistent.


4. --Portability:--

   - `$(...)` is more portable across different shells. While backticks are widely supported, `$(...)` is considered a more modern and POSIX-compliant syntax.


5. --Clarity:--

   - Using `$(...)` tends to make the code clearer and more maintainable, as it's more obvious where the command substitution begins and ends.


Given these reasons, it's generally recommended to use `$(...)` for command substitution in shell scripts. It offers improved readability, better nesting capabilities, and increased portability across different shell environments.


#CommandSubstitution

#ShellScriptingSyntax

#BackticksVsDollarParentheses

#VariableManipulation

#UnixShellTricks

#ScriptingTips

#CodeReadability

#ShellProgramming

#BashScripting

#ProgrammingTips

Understanding #FilePermissions and Timestamps with #Chmod, #Chown, #Chgrp, and #Touch Commands

In #Unix-based #operatingsystems, managing file permissions, ownership, and timestamps is pivotal for maintaining security and organizing data. The commands "#chmod", "#chown", "#chgrp", and "#touch" are powerful tools that enable users to control access rights and modify file timestamps effectively.

#Chmod - Changing File Permissions

"chmod" stands for "change mode" and is used to modify file permissions. It allows users to set permissions for read, write, and execute for the file owner, group, and others. For example, "chmod 755 filename" grants the owner full permissions (read, write, execute), and read and execute permissions to the group and others.

#Chown - Altering File Ownership

"chown" stands for "change owner" and is employed to change the owner of a file or directory. This command allows system administrators to transfer ownership to a specific user or group. For instance, "chown user:group filename" changes the owner and group of the file to the specified user and group.

#Chgrp - Modifying File Group

"chgrp" denotes "change group" and is used to modify the group ownership of files and directories. It enables users to assign a new group to a file. For instance, "chgrp newgroup filename" assigns the file to the specified group.

#Touch - Managing Timestamps

"touch" is a versatile command used primarily to create new empty files or update timestamps (access and modification) of existing files. When used with non-existing files, "touch" creates them; otherwise, it updates the timestamps. For example, "touch filename" creates a new file or updates its timestamp.

Understanding and effectively utilizing these commands are crucial for system administrators and users to manage file permissions, ownership, and timestamps efficiently. With "chmod", "chown", "chgrp", and "touch", users gain granular control over file attributes, enhancing system security and organization.

Monday, November 27, 2023

A bill intimation #scam is a type of #fraud in which scammers trick people into paying fake bills. This #scam is particularly common in India, where it has caused significant financial losses to unsuspecting #victims.


A bill intimation #scam is a type of #fraud in which scammers trick people into paying fake bills. This #scam is particularly common in India, where it has caused significant financial losses to unsuspecting #victims.

How the #scam works

Scammers typically use SMS, email, or phone calls to contact potential #victims. They pose as representatives of legitimate businesses, such as #electricityproviders, #creditcardcompanies, or #telecommunicationscompanies. They often use official-looking logos and language to make their communications appear authentic.

The scammers will then inform the victim that they have an unpaid bill. They may even include details such as the victim's account number or the amount of the supposed outstanding balance. To create a sense of urgency, they may threaten to disconnect the victim's services or take other punitive actions if the bill is not paid immediately.

The scammers will then provide the victim with a link or phone number to make a payment. This link or phone number will typically lead to a fake website or a scammer's phone line. Once the victim enters their payment information, the scammers will steal it and use it to drain their bank account or make unauthorized purchases.

How to protect yourself from bill intimation scams

There are a number of things you can do to protect yourself from bill intimation scams:

  • Be suspicious of unsolicited messages. If you receive an email, SMS, or phone call from a company claiming that you have an unpaid bill, be suspicious. Do not click on any links or provide any personal information until you have verified the legitimacy of the message.
  • Contact the company directly. If you are unsure whether a message is legitimate, contact the company directly using the phone number or website listed on your bill or statement. Do not use the phone number or website provided in the suspicious message.
  • Never make payments through third-party websites or phone numbers. Legitimate companies will never ask you to make payments through third-party websites or phone numbers. Only make payments through the company's official website or app.
  • Beware of urgent or threatening language. Scammers often use urgent or threatening language to create a sense of panic and pressure you into making a hasty payment. Do not let yourself be rushed into making a decision.
  • Install anti-malware software. Anti-malware software can help to protect you from #phishingwebsites and other online #scams.

If you think you have been the victim of a bill intimation #scam, you should contact your bank or credit card company immediately to report the fraudulent activity. You should also file a police report.

#billintimationscam,

#scam,

#fraud,

#victims,

#electricityproviders,

#creditcardcompanies,

#telecommunicationscompanies,

#phishingwebsites,

#onlinescams


Featured Posts

Kali Linux Remote Desktop: Access GNOME from Windows Using Native RDP

  Kali Linux + GNOME 50 + GNOME Remote Desktop + Windows Remote Desktop (MSTSC) Getting a full GNOME desktop remotely on Kali Linux can be ...