public void DownloadFileFromLibrary(string siteUrl, string webName, string libraryName, string subfolderPath, string fileName, string downloadPath)
{
    using (ClientContext clientContext = new ClientContext(siteUrl))
    {
        string filePath = string.Empty;
        if (!string.IsNullOrEmpty(subfolderPath))
        {
            filePath = string.Format("/{0}/{1}/{2}/{3}", webName, libraryName, subfolderPath, fileName);
        }
        else
        {
            filePath = string.Format("/{0}/{1}/{2}", webName, subfolderPath, fileName);
        }

        var fileInformation = File.OpenBinaryDirect(clientContext, filePath);
        var stream = fileInformation.Stream;
        IList<byte> content = new List<byte>();
        int b;
        while ((b = fileInformation.Stream.ReadByte()) != -1)
        {
            content.Add((byte)b);
        }
        var downloadFileName = Path.Combine(downloadPath, fileName);
        System.IO.File.WriteAllBytes(downloadFileName, content.ToArray());
        fileInformation.Stream.Close();
    }
}

Learn. Build. Automate. Innovate. Technology • AI • Programming • Linux • Cloud • Tutorials
Showing posts with label sharepoint document library.. Show all posts
Showing posts with label sharepoint document library.. Show all posts
Tuesday, November 8, 2011
Download File From Library

SharePoint Upload File in Library
public void UploadFileInLibrary(string siteUrl, string webName, string libraryName, string subfolderPath, string fileName)
{
    using (ClientContext clientContext = new ClientContext(siteUrl))
    {

        string uploadLocation = Path.GetFileName(fileName);
        if (!string.IsNullOrEmpty(subfolderPath))
        {
            uploadLocation = string.Format("{0}/{1}", subfolderPath, uploadLocation);
        }
        uploadLocation = string.Format("/{0}/{1}/{2}", webName, libraryName, uploadLocation);
        var list = clientContext.Web.Lists.GetByTitle(libraryName);
        var fileCreationInformation = new FileCreationInformation();
        fileCreationInformation.Content = System.IO.File.ReadAllBytes(fileName);
        fileCreationInformation.Overwrite = true;
        fileCreationInformation.Url = uploadLocation;
        list.RootFolder.Files.Add(fileCreationInformation);
        clientContext.ExecuteQuery();
    }
}
Wednesday, October 5, 2011
Configure Item Level Permissions for Document Libraries
Here is what you need to do:
You can also customize this workflow and add permissions for other users as well.
- Create a new Document Library (e.g. Top Secret Documents)
- Go to Document Library Settings > Permissions for this document library
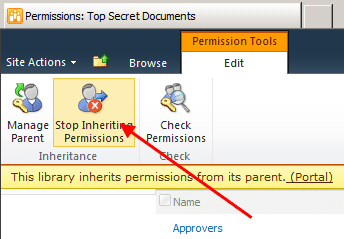
- Click on Stop Inheriting Permissions command from the ribbon
- Revoke permissions for all but few important groups (e.g. Portal Owners and Portal Members).
Please note: Steps 2. – 4- are optional but workflow is going to be much simpler if there are fewer permissions to manage - Open your site in SharePoint Designer, and select Workflows option and your list from the ribbon
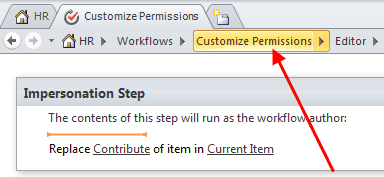
- Type the name for the new workflow (e.g. Customize Permissions)
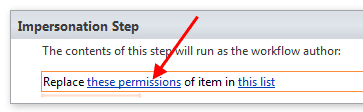
- Insert a new Impersonation Step. This special step runs each activity as workflow author.
Make sure workflow author (you) has proper privileges to manage permissions for this list.
- From the list of workflow actions choose “Replace Item Permissions
- Click Replace these permissions
- In the dialog click Add
- In the Choose permission to grant dialog click Contribute, and then click Choose… button
- Add User who created current item to the Selected users list
- Click the workflow name (e.g. “Customize Permissions”) to manage workflow settings
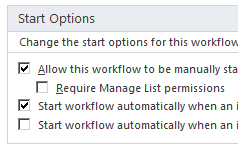
- Make sure you have selected the correct Start options
- Publish your workflow


You can also customize this workflow and add permissions for other users as well.
Subscribe to:
Posts (Atom)
Featured Posts
Kali Linux Remote Desktop: Access GNOME from Windows Using Native RDP
Kali Linux + GNOME 50 + GNOME Remote Desktop + Windows Remote Desktop (MSTSC) Getting a full GNOME desktop remotely on Kali Linux can be ...

-
public struct CoOrds { public int x, y; public CoOrds( int p1, int p2) { x = p1; y = p2; } }
-
LM Studio Overview LM Studio is a desktop application designed for developing and experimenting with large language models (LLMs)...
