If you're seeing a message that Windows Server 2008 is required, refer to the installation instructions for installing SharePoint on Windows 7. The very first thing you need to do is edit the configuration file to allow installation on a Windows client. These are available at http://msdn.microsoft.com/en-us/library/ee554869(office.14).aspx.

Learn. Build. Automate. Innovate. Technology • AI • Programming • Linux • Cloud • Tutorials
Showing posts with label sharepoint. Show all posts
Showing posts with label sharepoint. Show all posts
Friday, November 11, 2011

Thursday, November 10, 2011
Creating a Site Context Search Box that Uses SharePoint Portal Server Search Results
When you create Microsoft Windows SharePoint Services sites, Meeting
Workspace sites, and Document Workspace sites that are linked to
Microsoft Office SharePoint Portal Server 2003 portal sites, you may
want to use the search engine of the portal site to search all your
sites. When you use Microsoft SharePoint Portal Server Search service
(SharePointPSSearch), you get the added benefits of a consistent user
interface and the ability to search multiple levels of the site
hierarchy with one request.
The following table lists and describes the items available for search when you use either the search capability in Microsoft SQL Server (on which Windows SharePoint Services is based) or the search capability in SharePoint Portal Server 2003.
The following table lists and describes the items available for search when you use either the search capability in Microsoft SQL Server (on which Windows SharePoint Services is based) or the search capability in SharePoint Portal Server 2003.
Packaging and Deploying Web Parts for Microsoft Windows SharePoint Services
Web Parts are more than just the assemblies into which they are
compiled. A Web Part may have class resources such as images, Microsoft
JScript® files, and Help files. These files may also be localized and
deployed in locations that are different from the location of the Web
Part. Additionally, the Web Part must be added to the SafeControl list
for the specific virtual server before users can take advantage of its
functionality.
Prerequisites
Prerequisites
- Familiarity with Microsoft Windows® SharePoint™ Services and/or Microsoft Office SharePoint Portal Server 2003
- Knowledge about how to create a Web Part
- Familiarity with the Web Part infrastructure
Creating Event Log Messages for a Document Library in Microsoft Windows SharePoint Services
The following table describes the events for document libraries
provided by Windows SharePoint Services for which you can enable
logging.
Table 1. Document library events
| Event | Description |
|---|---|
| Cancel Check Out | Changes made to a checked out document are undone. |
| Check In | A document is checked in to the document library. |
| Check Out | A document is checked out from the document library. |
| Copy | A document in the document library is copied. |
| Delete | A document is deleted from the document library. |
| Insert | A new document is saved to the document library. |
| Move or Rename | A document is moved or renamed. |
| Update | An existing document or the value of a custom column in the library is edited. |
ASP.NET and SharePoint Security Policies
You can specify a level of trust that corresponds to a predefined set
of permissions for ASP.NET applications. By default, ASP.NET defines
the following trust levels:
Additionally, Windows SharePoint Services defines two trust levels of its own:
local_drive:\Program Files\Common Files\Microsoft Shared\web server extensions\60\config
By default, when you extend a virtual server with Windows SharePoint Services, Windows SharePoint Services sets the trust level to WSS_Minimal. This helps provide a secure trust level in which assemblies operate with the smallest set of permissions required for code to execute.
The following table outlines the specific permissions granted with the custom security policy files included with Windows SharePoint Services.
- Full
- High
- Medium
- Low
- Minimal
Additionally, Windows SharePoint Services defines two trust levels of its own:
- WSS_Minimal
- WSS_Medium
local_drive:\Program Files\Common Files\Microsoft Shared\web server extensions\60\config
By default, when you extend a virtual server with Windows SharePoint Services, Windows SharePoint Services sets the trust level to WSS_Minimal. This helps provide a secure trust level in which assemblies operate with the smallest set of permissions required for code to execute.
The following table outlines the specific permissions granted with the custom security policy files included with Windows SharePoint Services.
| Permission | WSS_Medium trust level | WSS_Minimal trust level |
|---|---|---|
| AspNetHostingPermission | Medium | Minimal |
| Environment | Read: TEMP, TMP, OS, USERNAME, COMPUTERNAME | |
| FileIO | Read, Write, Append, PathDiscovery:Application Directory | |
| IsolatedStorage | AssemblyIsolationByUser, Unrestricted UserQuota | |
| Reflection | ||
| Registry | ||
| Security | Execution, Assertion, ControlPrincipal, ControlThread, RemotingConfiguration | Execution |
| Socket | ||
| WebPermission | Connect to origin host (if configured) | |
| DNS | Unrestricted | |
| Printing | Default printing | |
| OleDBPermission | ||
| SqlClientPermission | AllowBlankPassword=false | |
| EventLog | ||
| Message Queue | ||
| Service Controller | ||
| Performance Counters | ||
| Directory Service | ||
| SharePointPermission | ObjectModel = true | |
| WebPartPermission | Connections = true | Connections = true |
Note By default, Windows SharePoint Services does not grant access to the Microsoft SharePoint object model. To grant access, you must raise the associated trust level by one of several methods. The next section discusses these methods.
Wednesday, October 5, 2011
Configure Item Level Permissions for Document Libraries
Here is what you need to do:
You can also customize this workflow and add permissions for other users as well.
- Create a new Document Library (e.g. Top Secret Documents)
- Go to Document Library Settings > Permissions for this document library
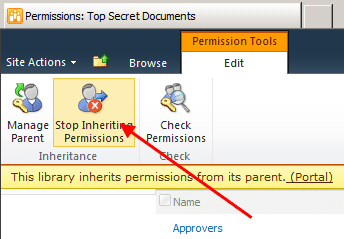
- Click on Stop Inheriting Permissions command from the ribbon
- Revoke permissions for all but few important groups (e.g. Portal Owners and Portal Members).
Please note: Steps 2. – 4- are optional but workflow is going to be much simpler if there are fewer permissions to manage - Open your site in SharePoint Designer, and select Workflows option and your list from the ribbon
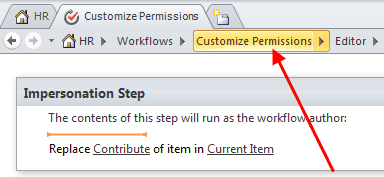
- Type the name for the new workflow (e.g. Customize Permissions)
- Insert a new Impersonation Step. This special step runs each activity as workflow author.
Make sure workflow author (you) has proper privileges to manage permissions for this list.
- From the list of workflow actions choose “Replace Item Permissions
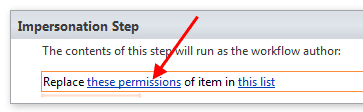
- Click Replace these permissions
- In the dialog click Add
- In the Choose permission to grant dialog click Contribute, and then click Choose… button
- Add User who created current item to the Selected users list
- Click the workflow name (e.g. “Customize Permissions”) to manage workflow settings
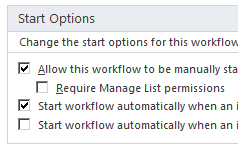
- Make sure you have selected the correct Start options
- Publish your workflow


You can also customize this workflow and add permissions for other users as well.
Thursday, July 7, 2011
Deleting a Web Part from a page
using System;
using Microsoft.SharePoint.Client;
using Microsoft.SharePoint.Client.WebParts;
namespace SampleCode
{
class DeleteWebPart
{
static void Main()
{
ClientContext oClientContext = new ClientContext("http://MyServer/sites/MySiteCollection");
File oFile = oClientContext.Web.GetFileByServerRelativeUrl("/sites/MySiteCollection/SitePages/Home.aspx ");
LimitedWebPartManager limitedWebPartManager = oFile.GetLimitedWebPartManager(PersonalizationScope.Shared);
oClientContext.Load(limitedWebPartManager.WebParts);
oClientContext.ExecuteQuery();
if (limitedWebPartManager.WebParts.Count == 0)
{
throw new Exception("No Web Parts to delete.");
}
WebPartDefinition webPartDefinition = limitedWebPartManager.WebParts[0];
webPartDefinition.DeleteWebPart();
oClientContext.ExecuteQuery();
}
}
}
using Microsoft.SharePoint.Client;
using Microsoft.SharePoint.Client.WebParts;
namespace SampleCode
{
class DeleteWebPart
{
static void Main()
{
ClientContext oClientContext = new ClientContext("http://MyServer/sites/MySiteCollection");
File oFile = oClientContext.Web.GetFileByServerRelativeUrl("/sites/MySiteCollection/SitePages/Home.aspx ");
LimitedWebPartManager limitedWebPartManager = oFile.GetLimitedWebPartManager(PersonalizationScope.Shared);
oClientContext.Load(limitedWebPartManager.WebParts);
oClientContext.ExecuteQuery();
if (limitedWebPartManager.WebParts.Count == 0)
{
throw new Exception("No Web Parts to delete.");
}
WebPartDefinition webPartDefinition = limitedWebPartManager.WebParts[0];
webPartDefinition.DeleteWebPart();
oClientContext.ExecuteQuery();
}
}
}
Adding a Web Part to a page
using System;
using Microsoft.SharePoint.Client;
using Microsoft.SharePoint.Client.WebParts;
namespace SampleCode
{
class AddWebPart
{
static void Main()
{
ClientContext oClientContext = new ClientContext("http://MyServer/sites/MySiteCollection");
File oFile = oClientContext.Web.GetFileByServerRelativeUrl("Default.aspx");
LimitedWebPartManager limitedWebPartManager = oFile.GetLimitedWebPartManager(PersonalizationScope.Shared);
string xmlWebPart = "" +
"
" xmlns=\"http://schemas.microsoft.com/WebPart/v2\">" +
"My Web Part Default " +
"Use for formatted text, tables, and images. " +
"true 0 " +
"Normal true " +
"true true " +
"true true " +
"true true
"Modeless Default
"Cannot import this Web Part. " +
"/_layouts/images/mscontl.gif
"Microsoft.SharePoint, Version=13.0.0.0, Culture=neutral, " +
"PublicKeyToken=94de0004b6e3fcc5 " +
"Microsoft.SharePoint.WebPartPages.ContentEditorWebPart " +
"
"" +
"
And this is a second paragraph.]]>" +
using Microsoft.SharePoint.Client;
using Microsoft.SharePoint.Client.WebParts;
namespace SampleCode
{
class AddWebPart
{
static void Main()
{
ClientContext oClientContext = new ClientContext("http://MyServer/sites/MySiteCollection");
File oFile = oClientContext.Web.GetFileByServerRelativeUrl("Default.aspx");
LimitedWebPartManager limitedWebPartManager = oFile.GetLimitedWebPartManager(PersonalizationScope.Shared);
string xmlWebPart = "" +
"
" xmlns=\"http://schemas.microsoft.com/WebPart/v2\">" +
"
"
"
"
"
"
"
"
"
"
"
"PublicKeyToken=94de0004b6e3fcc5
"
"
"
"
"
WebPartDefinition oWebPartDefinition = limitedWebPartManager.ImportWebPart(xmlWebPart);
limitedWebPartManager.AddWebPart(oWebPartDefinition.WebPart, "Left", 1);
oClientContext.ExecuteQuery();
}
}
}
Updating the title of a Web Part
using System; using Microsoft.SharePoint.Client; using Microsoft.SharePoint.Client.WebParts; namespace SampleCode { class UpdateWebPartTitle { static void Main() { ClientContext oClientContext = new ClientContext("http://MyServer/sites/MySiteCollection"); File oFile = oClientContext.Web.GetFileByServerRelativeUrl("Default.aspx"); LimitedWebPartManager limitedWebPartManager = oFile.GetLimitedWebPartManager(PersonalizationScope.Shared); oClientContext.Load(limitedWebPartManager.WebParts, wps => wps.Include( wp => wp.WebPart.Title)); oClientContext.ExecuteQuery(); if (limitedWebPartManager.WebParts.Count == 0) { throw new Exception("No Web Parts on this page."); } WebPartDefinition oWebPartDefinition = limitedWebPartManager.WebParts[1]; WebPart oWebPart = oWebPartDefinition.WebPart; oWebPart.Title = "My New Web Part Title"; oWebPartDefinition.SaveWebPartChanges(); oClientContext.ExecuteQuery(); } } }
Tuesday, June 28, 2011
Fetching user names and E-mail Addresses from SPGroups
There are various groups present over a SharePoint Site. The below code can extract email addresses of all the existing users in all the groups.
Code to get the user names:
using System;
using System.Collections.Generic;
using System.Linq;
using System.Text;
using Microsoft.SharePoint;
namespace ConsoleApplication1
{
class Program
{
static void Main(string[] args)
{
string username;
SPSite spsite = new SPSite("site url"); //Ex: http://adfsaccount:2222/
SPWeb web= spsite.RootWeb;
SPUserCollection userlist= web.AllUsers;
foreach (SPUser u in userlist)
{
username=u.Name;
}
}
}
}
Code to get the email addresses:
using System;
using System.Collections.Generic;
using System.Linq;
using System.Text;
using Microsoft.SharePoint;
namespace ConsoleApplication1
{
class Program
{
static void Main(string[] args)
{
SPSite spsite = new SPSite("site url"); //Ex: http://adfsaccount:2222/
SPWeb web= spsite.RootWeb;
SPUserCollection userlist= web.AllUsers;
foreach (SPUser u in userlist)
{
string email = u.Email.ToString();
}
}
}
}
Friday, June 17, 2011
Exporting a Published site / Web Part /Site Template from SharePoint 2010 Enterprise and Importing Into Standard
When stsadm.exe export and import commands are used to move content ,this doesn’t always go as smoothly as planned. Usually site features that exist on the source, but not at the destination is the problem. When importing, you will receive an error indicating that a particular feature can’t be found.
Normally this is because of custom or third party solutions/features, but can also be an issue with out of the box deployments moving content from an Enterprise edition to a standard edition (but not the other way around).
There is some guidance for dealing with this out there for SharePoint 2007 but not much for 2010. Having recently gone through this in a trial and error fashion, I thought that I would share what worked. Essentially, you need to remove the offending feature before you do the export, deactivating doesn’t always suffice. My case below is for a publishing site, and your mileage will vary depending on the site template that you are using. First, the offending features are uninstalled:
stsadm -o uninstallfeature -force -name WACustomReports
stsadm -o uninstallfeature -force -name BizAppsListTemplates
stsadm -o uninstallfeature -force -name IPFSSiteFeatures
stsadm -o uninstallfeature -force -name ReportListTemplate
stsadm -o uninstallfeature -force -name DataConnectionLibrary
stsadm -o uninstallfeature -force -name PremiumSite
stsadm -o uninstallfeature -force -name PremiumWeb
Then the site is exported:
stsadm –o export –url http://mysiteaddress –filename myexportfile
Once done, the export file can be imported. However, don’t forget to reinstall those features – the previous step uninstalled them from all application (read – use with caution)
stsadm -o installfeature -force -name WACustomReports
stsadm -o installfeature -force -name BizAppsListTemplates
stsadm -o installfeature -force -name IPFSSiteFeatures
stsadm -o installfeature -force -name ReportListTemplate
stsadm -o installfeature -force -name DataConnectionLibrary
stsadm -o installfeature -force -name PremiumSite
stsadm -o installfeature -force -name PremiumWeb
Your mileage may vary depending on what you have in your farm, but all you need to do is to add to the commands above with the features in question.
Normally this is because of custom or third party solutions/features, but can also be an issue with out of the box deployments moving content from an Enterprise edition to a standard edition (but not the other way around).
There is some guidance for dealing with this out there for SharePoint 2007 but not much for 2010. Having recently gone through this in a trial and error fashion, I thought that I would share what worked. Essentially, you need to remove the offending feature before you do the export, deactivating doesn’t always suffice. My case below is for a publishing site, and your mileage will vary depending on the site template that you are using. First, the offending features are uninstalled:
stsadm -o uninstallfeature -force -name WACustomReports
stsadm -o uninstallfeature -force -name BizAppsListTemplates
stsadm -o uninstallfeature -force -name IPFSSiteFeatures
stsadm -o uninstallfeature -force -name ReportListTemplate
stsadm -o uninstallfeature -force -name DataConnectionLibrary
stsadm -o uninstallfeature -force -name PremiumSite
stsadm -o uninstallfeature -force -name PremiumWeb
Then the site is exported:
stsadm –o export –url http://mysiteaddress –filename myexportfile
Once done, the export file can be imported. However, don’t forget to reinstall those features – the previous step uninstalled them from all application (read – use with caution)
stsadm -o installfeature -force -name WACustomReports
stsadm -o installfeature -force -name BizAppsListTemplates
stsadm -o installfeature -force -name IPFSSiteFeatures
stsadm -o installfeature -force -name ReportListTemplate
stsadm -o installfeature -force -name DataConnectionLibrary
stsadm -o installfeature -force -name PremiumSite
stsadm -o installfeature -force -name PremiumWeb
Your mileage may vary depending on what you have in your farm, but all you need to do is to add to the commands above with the features in question.
Web Part / Solution Deployment
There are may ways to deploy the Sharepoint solutions depending on the environment. if you have .wsp package ready and you want to deploy it to some sharepoint Server where visual studio is not availabe to deploy it, the following Power shell script can be useful....
follow the steps bellow.
go to START==>>All Programs==>>Microsoft SharePoint 2010 Products==>>SahrePoint 2010 management Shell.(Run it as Administrator)
to deploy particular solution run the following power shell command
Add-SPSolution "D:\WebPartZone\Eventproject_SO.wsp"
3.after deploying the solution to enable it to particular Web Application run the following command with proper web app URL.
Install-SPSolution –Identity "Eventproject_SO.wsp" –WebApplication "Url" -GACDeployment
follow the steps bellow.
go to START==>>All Programs==>>Microsoft SharePoint 2010 Products==>>SahrePoint 2010 management Shell.(Run it as Administrator)
to deploy particular solution run the following power shell command
Add-SPSolution "D:\WebPartZone\Eventproject_SO.wsp"
3.after deploying the solution to enable it to particular Web Application run the following command with proper web app URL.
Install-SPSolution –Identity "Eventproject_SO.wsp" –WebApplication "Url" -GACDeployment
Thursday, June 16, 2011
Add Web Part inside Master Page in Sharepoint
How you can make a custom web part as part of your master page?
Follow the steps given below to add a web part inside a master page.
1. Deploy the web part in your web application as you do normally.
2. Check whether the web part is showing up in the web part gallery.
3. Create a web part page by navigating to the site settings, create web part page.
4. Add your custom web part on the web part page.
5. Start SharePoint designer and open the newly created web part page.
6. You will now find two entries corresponding to the web part you added on the page
In the page declaration you will find a entry which looks something like this:
"<%@ Register TagPrefix="WpNs0" Namespace="MyNamespace.MyClass" Assembly=" MyNamespace.MyClass, Version=1.0.0.0, Culture=neutral, PublicKeyToken=null"%>"
Click on the web part section in the page and you will see an entry like this:
"<WpNs0:WebPartName runat="server" ID="g_34cdbb90_38c6_4561_9182_8fbc0d2423a6" ExportMode="All" Title="WebPartTitle" __MarkupType …………….."
7. Copy these entries in separate notepad, and close the page opened in the SharePoint designer.
8. Now open the master page in SharePoint designer and add the first entry in the declaration
section and second entry at the place where you want to add the web part to.
9. Save the page, check in and publish it and that’s it. Your job is done.
10. Now you can save the above two tags for further use and you can remove web part page from your site.
Programmatically retrive content database name for Sharepoint Web Application
using (SPSite startSite = new SPSite("url"))
{
SPFarm farm = startSite.WebApplication.Farm;
SPWebService service = farm.Services.GetValue("");
foreach (SPWebApplication webApplication in service.WebApplications)
{
foreach (SPSite site in webApplication.Sites)
{
Console.WriteLine(string.Format("{0} - {1}", site.Url, site.ContentDatabase.Name));
}
}
}
Tuesday, June 7, 2011
Getting List of all list in a sharepoint site using client object model
using System;
using System.Collections.Generic;
using System.Linq;
using System.Text;
using Microsoft.SharePoint.Client;
using Microsoft.SharePoint.Client.Utilities;
private static void GetAllListsinCurrentWeb()
{
ClientContext Context = new ClientContext(“http://sharepointsite/“);
Web Web= Context.Web;
Context.Load(oWeb);
Context.ExecuteQuery();
ListCollection currentListCollection= oWeb.Lists;
Context.Load(currentListCollection);
Context.ExecuteQuery();
foreach (List List in currentListCollection)
{
Console.WriteLine(List.Title);
}
Console.ReadLine();
}
Tuesday, May 17, 2011
Copy listitems from one custom list to another, then move them into subfolders.
SPListItem listItem = web.GetListItem(listItemUrl);
listItem.CopyTo(destinationUrl); // Copies the item to the specified destinations
listItem.CopyTo(destinationUrl); // Copies the item to the specified destinations
or
listItem.CopyFrom(sourceUrl); // Overwrites the current item with the specified version of the item.
SPListItem item = Web.Lists["Announcement"].GetItemById(5);
SPFile file = Web.GetFile(item.Url);
file.MoveTo("New location...with the ID_.000");
SPFile file = Web.GetFile(item.Url);
file.MoveTo("New location...with the ID_.000");
Copy file and folder recursively from local drive to SharePoint list.
using System;
using System.Collections.Generic;
using System.ComponentModel;
using System.Data;
using System.Drawing;
using System.Linq;
using System.Text;
using System.Windows.Forms;
using Microsoft.SharePoint;
using System.IO;
using System.Text.RegularExpressions;
namespace WindowsFormsApplication2
{
public partial class Uploder : Form
{
public Uploder()
{
InitializeComponent();
}
private void textBox1_TextChanged(object sender, EventArgs e)
{
}
private void button1_Click(object sender, EventArgs e)
{
selectFolder.ShowDialog();
textBox1.Text = selectFolder.SelectedPath;
using (SPSite site = new SPSite(textBox2.Text))
{
using (SPWeb rootWeb = site.OpenWeb())
{
ActionDocLibRecursive(rootWeb);
}
}
}
private void ActionDocLibRecursive(SPWeb web)
{
// loop through each list in the web site
foreach (SPList list in web.Lists)
{
// check if the list is a document library
if (list.BaseType == SPBaseType.DocumentLibrary)
{
// if it is, create a document library object
SPDocumentLibrary docLib = (SPDocumentLibrary)list;
// check that the document library is not a "catalog"
// (e.g. "Master Pages & Page Layouts" .. or "Web Template Gallery")
if (docLib.IsCatalog == false)
{
LibList.Items.Add(docLib);
}
}
}
// call the recursive loop back on itself
//foreach (SPWeb subWeb in web.Webs)
//{
// // call resursive method on each sub-site of the current site
// ActionDocLibRecursive(subWeb);
//}
}
private void comboBox1_SelectedIndexChanged(object sender, EventArgs e)
{
button2.Enabled = true;
}
private void button2_Click(object sender, EventArgs e)
{
try
{
selectFolder.ShowDialog();
textBox1.Text = selectFolder.SelectedPath;
string localPath = selectFolder.SelectedPath; //Local path.
string sharePointSite = "http://blr-ws-168/"; //SharePoint site URL.
string documentLibraryName = "Documents"; // SharePoint library name.
// Make an object of your SharePoint site.
using (SPSite oSite = new SPSite(sharePointSite))
{
SPWeb oWeb = oSite.OpenWeb();
ActionDocLibRecursive(oWeb);
CreateDirectories(localPath,oWeb.Folders[documentLibraryName].SubFolders);
}
}
catch (Exception ex)
{
// MessageBox.Show("Error:" + ex.Message);
// richTextBox1.AppendText( ex.Message + "\n");
}
}
private void CreateDirectories(string path, SPFolderCollection oFolderCollection)
{
//Upload Multiple Files
foreach (FileInfo oFI in new DirectoryInfo(path).GetFiles())
{
CreateValidFileName(oFI.Name);
FileStream fileStream = File.OpenRead(oFI.FullName);
SPFile spfile = oFolderCollection.Folder.Files.Add
(oFI.Name, fileStream, true);
label4.Text = oFI.Name;
spfile.Update();
//richTextBox1.AppendText(oFI.Name + "Was Added Sucessfully\n"+ " In "+ spfile);
}
//Upload Multiple Folders
foreach (DirectoryInfo oDI in new DirectoryInfo(path).GetDirectories())
{
string sFolderName = oDI.FullName.Split('\\')[oDI.FullName.Split('\\').Length - 2];
SPFolder spNewFolder = oFolderCollection.Add(sFolderName);
spNewFolder.Update();
//Recursive call to create child folder
CreateDirectories(oDI.FullName, spNewFolder.SubFolders);
}
}
public void CreateValidFileName(string Filename)
{
string invalidChars = Regex.Escape(new string(Path.GetInvalidFileNameChars()));
string invalidReStr = string.Format(@"[{0}]+", invalidChars);
Filename = Regex.Replace(Filename, invalidReStr, "_");
}
}
}
How to programmatically download attachments from list items in Windows
SPWeb web = new SPSite("<Site URL>").OpenWeb(); SPList list = web.Lists["<ListName>"]; SPListItem item = list.Items[1]; folder = web.Folders["Lists"].SubFolders[strListName].SubFolders["Attachments"].SubFolders[item.ID.ToString()]; foreach(SPFile file in folder.Files) { byte[] binFile = file.OpenBinary(); System.IO.FileStream fstream = System.IO.File.Create("c:\\MyDownloadFolder\\" + file.Name); fstream.Write(binFile, 0, binFile.Length); }
Monday, May 16, 2011
Using SP.UI.ModalDialog in SharePoint 2010
Modal dialogs in SharePoint 2010 use the client library SP.UI.ModalDialog and showModalDialog. We can do the following within the context of a page without leaving the page:
- Add and Edit metadata
- Perform administrative task
- Attach documents/files
The following step-by-step instructions show you how to implement a modal dialog in your server side pages:
- Create a hyperlink that will be responsible for triggering your modal. Set the onclick attribute as follows:
- Implement the openDialog function in javascript.
- Create hidden fields to store the information you will need to modify the url.
- Setup the hidden fields in your Page_Load event.
- Use the hidden fields in the javascript function you wrote above.
To be more dynamic…
Hard coding the url is not recommended because it is really hard to maintain. There are lots of ways to make your code dynamic and this is only one of them. We could have also leveraged the url query strings that contain most of this information.
First we create the JavaScript function that will open up the new modal view. Notice I’m passing variables to the function for the file path, width and height. I did this so I can reuse the function for a variety of modal view calls for different purposes.
functionModalDialog(FormPath, FormWidth, FormHeight) {
varoptions = SP.UI.$create_DialogOptions();
options.url = FormPath;
options.width = FormWidth;
options.height = FormHeight;
options.allowMaximize = false;
options.dialogReturnValueCallback = Function.createDelegate(null, CloseCallback);
SP.UI.ModalDialog.showModalDialog(options);
}
varoptions = SP.UI.$create_DialogOptions();
options.url = FormPath;
options.width = FormWidth;
options.height = FormHeight;
options.allowMaximize = false;
options.dialogReturnValueCallback = Function.createDelegate(null, CloseCallback);
SP.UI.ModalDialog.showModalDialog(options);
}
We now need to create our call back method called ‘CloseCallback’ as mentioned in the above function. This method will be used to capture the results of the modal and perform some sort of confirmation action.
functionCloseCallback(result, returnValue) {
alert(‘dialogResult’ + result + ‘\nreturnValue’+ returnValue);
alert(‘dialogResult’ + result + ‘\nreturnValue’+ returnValue);
if(result == SP.UI.DialogResult.OK)
{
SP.UI.Notify.addNotification(‘You chose the OK button’);
document.title = returnValue;
}
{
SP.UI.Notify.addNotification(‘You chose the OK button’);
document.title = returnValue;
}
if(result == SP.UI.DialogResult.cancel)
SP.UI.Notify.addNotification(‘You chose the Cancel button’);
}
SP.UI.Notify.addNotification(‘You chose the Cancel button’);
}
You’ll see from the above method that we provide an alert with the full feedback of the modal and then utilize the SP.UI.Notify class to provide additional methods of feedback.
Now all we need to do is add an onClick of onClientClick event to an object in your code.
onclick=”ModalDialog(‘/_layouts/TestPage.aspx’,’420′,’300′)”
This is a quick introduction, but it should be enough to get you going with the SP.UI.ModalDialog class.
Subscribe to:
Posts (Atom)
Featured Posts
Kali Linux Remote Desktop: Access GNOME from Windows Using Native RDP
Kali Linux + GNOME 50 + GNOME Remote Desktop + Windows Remote Desktop (MSTSC) Getting a full GNOME desktop remotely on Kali Linux can be ...

-
public struct CoOrds { public int x, y; public CoOrds( int p1, int p2) { x = p1; y = p2; } }
-
LM Studio Overview LM Studio is a desktop application designed for developing and experimenting with large language models (LLMs)...
