Friday, March 3, 2023

how to setup #kerberos in #emr

 To set up Kerberos in Amazon Elastic MapReduce (EMR), you need to follow these steps:

  1. Create a Kerberos realm: You can use an existing Kerberos realm or create a new one. A Kerberos realm is a collection of Kerberos principals and services that share a common security policy.

  2. Create a KDC (Key Distribution Center): The KDC is the server that issues and manages Kerberos tickets. You can use an existing KDC or create a new one.

  3. Set up the EMR cluster to use Kerberos: You need to enable Kerberos authentication for the EMR cluster. This can be done by specifying the Kerberos realm, KDC hostname, and other Kerberos-related configuration parameters when creating the EMR cluster.

  4. Configure EMR applications to use Kerberos: You need to configure the applications running on the EMR cluster to use Kerberos authentication. This can be done by specifying the appropriate configuration settings for each application.

  5. Test the Kerberos setup: Once you have configured Kerberos for EMR, you should test the setup to ensure that it is working correctly. You can do this by running sample jobs that use Kerberos authentication.

The exact steps for setting up Kerberos in EMR will depend on your specific requirements and environment. Amazon provides detailed documentation on how to set up Kerberos in EMR, which you can refer to for more information.

what is #crossrealm #trust?


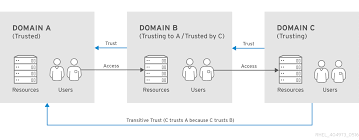
Cross-realm trust is a mechanism in computer networking and security that allows users from one domain or realm to access resources in another domain or realm. In simple terms, it enables the authentication and authorization of users from one security domain to access resources in another security domain.

Cross-realm trust is commonly used in environments with multiple Active Directory domains or forests, where users and resources are distributed across different domains. By establishing a trust relationship between domains, users in one domain can access resources in another domain without having to authenticate again.

For example, if an organization has two domains, Domain A and Domain B, users in Domain A can access resources in Domain B if a trust relationship is established between the two domains. This allows users to access resources, such as files or applications, without having to create separate accounts in Domain B.

There are several types of cross-realm trusts, including one-way trusts, two-way trusts, and forest trusts. Each type of trust has its own specific requirements and implications, and the trust relationship must be carefully configured and maintained to ensure security and proper access control.

Thursday, March 2, 2023

how to add #proxy user in #oozie or #hue


 To add a proxy user in Oozie or Hue, you will need to update the configuration files for these tools.

Here are the steps to add a proxy user in Oozie:

1.       Open the core-site.xml file, which is located in the Hadoop configuration directory. This directory is typically located at /etc/hadoop/conf/.

2.       Add the following configuration property to the file, replacing proxyuser with the username of the user you want to act as a proxy:

<property>

  <name>hadoop.proxyuser.proxyuser.hosts</name>

  <value>*</value>

</property>


3.       Add the following configuration property to the file, replacing proxyuser with the username of the user you want to act as a proxy, and user with the username of the user you want to allow to use the proxy:


<property>

  <name>hadoop.proxyuser.proxyuser.groups</name>

  <value>user</value>

</property>


4.       Save and close the configuration file.

5.       Restart the Oozie server to apply the changes.


Here are the steps to add a proxy user in Hue:


1.       Open the hue.ini configuration file, located in the Hue configuration directory. This directory is typically located at /etc/hue/conf/.

2.       Find the [desktop] section in the configuration file, and add the following setting:


[desktop].

proxy_username=proxyuser


3.       Save and close the configuration file.

4.       Restart the Hue server to apply the changes.


Note that adding a proxy user allows a specific user to act on behalf of another user. This can be a security risk, so it is important to carefully consider which users are allowed to act as proxies and which users are allowed to use proxies.

how to enable #impersonation in #hue or #oozie


Enabling impersonation in Hue or Oozie requires configuring the appropriate settings in their respective configuration files.

To enable #impersonation in #Hue, follow these steps:

1.       Open the hue.ini configuration file, located in the Hue configuration directory. This directory is typically located at /etc/hue/conf/.

2.       Find the [desktop] section in the configuration file, and add the following settings:

[desktop]
enable_impersonation=true

3.       Save and close the configuration file.

4.       Restart the Hue server to apply the changes.

To enable #impersonation in #Oozie, follow these steps:

1.       Open the oozie-site.xml configuration file, located in the Oozie configuration directory. This directory is typically located at /etc/oozie/conf/.

2.       Find the <property> section in the configuration file, and add the following property:

<property>
    <name>oozie.service.HadoopAccessorService.kerberos.enabled</name>
    <value>true</value>
</property>

3.       Save and close the configuration file.

4.       Restart the Oozie server to apply the changes.

Note that enabling #impersonation in #Hue and #Oozie requires #Kerberos #authentication to be enabled and properly configured in your #environment. Without proper Kerberos configuration, impersonation will not work correctly.

Wednesday, March 1, 2023

#Openshift: The Platform for Building, Deploying and Managing Applications

 If you are looking for a powerful and flexible platform for building, deploying and managing applications, Openshift is the perfect solution for you. Openshift is a container application platform that provides an enterprise-grade solution for creating and managing applications in a cloud environment.

With Openshift, you can easily build, deploy and manage your applications, regardless of the complexity or size of your project. This platform provides a range of features that can be used to automate the deployment and management process, making it much easier for developers to focus on writing code and delivering results.

One of the key features of Openshift is its ability to support multiple languages, frameworks and databases. This makes it easy for developers to work with a wide range of technologies and tools, depending on their specific needs. Additionally, Openshift provides a range of tools and services that can be used to manage the entire application lifecycle, from development to production.

Another great benefit of Openshift is its flexibility. It can be deployed on-premise, in a public or private cloud, or in a hybrid environment. This makes it a great option for organizations looking to build and deploy applications in a variety of environments.

In summary, Openshift is a powerful and flexible platform that provides a range of features and tools for building, deploying and managing applications. Whether you are a developer, an IT professional or a business owner, Openshift can help you streamline your application development and deployment process, saving you time and money in the long run.

Openshift: The Platform for Building, Deploying, and Managing Applications

If you are interested in trying out Openshift, you can get started with a free trial on the Openshift website. This will give you access to all of the platform's features and tools, allowing you to explore its capabilities and see how it can benefit your organization. Additionally, there is a large community of developers and users who are actively working with Openshift, so you can find plenty of resources and support to help you get started.

In terms of security, Openshift provides a range of features and tools to help ensure the safety and privacy of your applications and data. For example, the platform includes built-in security features like role-based access control, network policies, and container image signing. Additionally, Openshift is compliant with a range of industry standards and regulations, including HIPAA, PCI DSS, and GDPR.

Overall, Openshift is a comprehensive and reliable solution for building, deploying and managing applications in a cloud environment. Its flexibility, scalability, and security features make it a great choice for organizations of all sizes and industries. If you are interested in learning more about Openshift and how it can help your organization, be sure to check out the resources available on the website.

#Docker is a #containerization #platform

 Docker is an open-source containerization platform that allows developers to package an application and its dependencies into a containerized environment. Containers are lightweight, portable, and self-sufficient, which makes them ideal for deploying applications across different environments.

Docker provides a way to isolate applications from the underlying infrastructure, making it easier to deploy, manage, and scale applications. With Docker, developers can build, test, and deploy applications faster and more efficiently, without worrying about the underlying infrastructure.

One of the key benefits of Docker is its ability to run applications in a consistent environment, regardless of where they are deployed. This ensures that applications behave the same way in the development, testing, and production environments.

Docker also provides a range of tools and services that make it easy to manage containers at scale. These include Docker Compose, which allows developers to define and run multi-container applications, and Docker Swarm, which provides orchestration and clustering capabilities for large-scale deployments.

Overall, Docker has revolutionized the way applications are built, deployed, and managed, making it an essential tool for modern software development.

Docker's containerization technology has become a key component of many modern software development workflows. Its ability to create and manage lightweight, portable containers has made it easier to develop, test, and deploy applications across different environments. With its range of tools and services, Docker has made it easier for developers to manage containers at scale and deploy applications with confidence. As a result, Docker has become an essential tool for modern software development, helping teams to build better software faster and more efficiently.

In addition to its benefits for software development, Docker has also become popular in the field of DevOps. By providing a consistent and portable environment for applications, Docker makes it easier to manage infrastructure across different environments and deploy applications more quickly and reliably. This has led to the rise of the "containerization" trend in DevOps, with many organizations adopting Docker as a key part of their workflow.

#Kubernetes

Kubernetes is an open-source container orchestration platform that automates the deployment, scaling, and management of containerized applications. It was developed by Google and is now maintained by the Cloud Native Computing Foundation (CNCF).

Kubernetes provides a way to manage containerized applications by abstracting away the underlying infrastructure and providing a unified API for managing containers. It allows developers to focus on writing code and building applications without having to worry about the underlying infrastructure.

With Kubernetes, you can easily deploy and manage containerized applications across multiple hosts, scale them up or down as needed, and roll out updates without downtime. Kubernetes provides a number of features that make it easier to manage containers, including automatic load balancing, self-healing, and automatic scaling.

One of the key benefits of Kubernetes is its ability to manage containers at scale. With Kubernetes, you can easily manage thousands of containers across multiple hosts, making it ideal for large-scale deployments. It also provides a number of tools for monitoring and troubleshooting containerized applications, making it easier to identify and fix issues when they arise.

Overall, Kubernetes is a powerful platform for managing containerized applications. It provides a way to abstract away the underlying infrastructure and provides a unified API for managing containers. With its ability to manage containers at scale and its powerful toolset for monitoring and troubleshooting, Kubernetes is a popular choice for organizations looking to deploy containerized applications.

Kubernetes is a popular choice for organizations because of its many features and benefits. Here are some of the reasons why Kubernetes is a top choice for container orchestration:

  • Scalability: Kubernetes allows you to scale your applications up or down as needed, making it easy to handle traffic spikes or changes in demand.
  • Portability: Kubernetes is cloud-agnostic, which means you can deploy it on any cloud provider or on-premise data center.
  • Automation: Kubernetes automates many tasks, such as load balancing and self-healing, which makes it easier to manage your applications.
  • Flexibility: Kubernetes supports a wide range of container runtimes, including Docker, CRI-O, and containers.
  • Community: Kubernetes has a large and active community of developers and contributors, which means you can find support and resources easily.

Overall, Kubernetes is a powerful and flexible platform for managing containerized applications. Whether you are deploying a small application or a large-scale service, Kubernetes provides the tools and features you need to manage your containers with ease.

Tuesday, February 28, 2023

What is #IP Address and #Subnet?

 An IP address is like a phone number for devices on a computer network. It uniquely identifies each device so that they can communicate with each other.

A subnet is a way of dividing a larger network into smaller, more manageable sub-networks. This can be useful for security and organization purposes.

An IP range is a range of IP addresses within a subnet. It is a set of numbers that defines the beginning and end of the range of IP addresses that are available for use within that subnet.

For example, if you have a network with the IP address 192.168.0.0 and a subnet mask of 255.255.255.0, you can divide the network into smaller subnets, such as 192.168.0.0/24, 192.168.0.0/25, or 192.168.0.0/26. Each of these subnets will have its own IP range.

The IP range for a subnet is calculated based on the number of bits in the subnet mask. For example, a subnet mask of /24 means that the first 24 bits of the IP address are used to identify the network, and the remaining 8 bits are available for use within the subnet. So the IP range for a /24 subnet would be from 192.168.0.1 to 192.168.0.254.

In simple words, a subnet is like a neighborhood within a city, and an IP range is like the range of house numbers within that neighborhood. Each neighborhood has its own set of house numbers, and each IP range has its own set of IP addresses that can be used within that subnet.

Most common #apache #hadoop #error #messages

 1.       java.io.IOException: This error occurs when Hadoop encounters an issue while reading or writing data.

2.       File not found exception: This error occurs when Hadoop is unable to find the specified file or directory.

3.       NameNode is in Safe Mode: This error message indicates that the Hadoop NameNode is in safe mode, which restricts write operations to the Hadoop file system.

4.       Unable to create directory: This error occurs when Hadoop is unable to create a directory in the file system.

5.       Block Missing Exception: This error message indicates that a block of data is missing from the Hadoop file system.

6.       Permission denied: This error occurs when the user does not have the required permissions to perform the requested operation.

7.       Task attempt failed to report status: This error message indicates that the Hadoop job failed to report its status to the JobTracker.

8.       Exceeded maximum allowed attempts: This error occurs when a task in Hadoop exceeds the maximum number of allowed attempts.

9.       Namenode not starting: This error occurs when the Hadoop NameNode process fails to start, often due to an issue with the file system or configuration.

10.   DataNode not starting: This error occurs when the Hadoop DataNode process fails to start, often due to an issue with the file system or configuration.

11.   Corrupt block pool: This error occurs when the Hadoop NameNode detects corruption in the block pool, often due to hardware or file system issues.

12.   Incorrect block size: This error occurs when the Hadoop NameNode detects that a block has been written with an incorrect size, often due to a configuration issue or bug in the code.

13.   Permission denied: This error occurs when the user does not have the required permissions to perform the requested operation on the Hadoop file system.

14.   Invalid input: This error occurs when the input data provided to a Hadoop job is not valid or does not match the expected format.

15.   Connection refused: This error occurs when Hadoop is unable to connect to a remote service, often due to network issues or configuration problems.

16.   TaskTracker failed to start: This error occurs when the Hadoop TaskTracker process fails to start, often due to an issue with the configuration or file system.

What are the most common #apache #spark #error #messages

1.       NullPointerException: This error occurs when you try to reference a null object or variable.

2.       Task not serializable: This error occurs when you try to pass a non-serializable object to a Spark task.

3.       Missing input path: This error occurs when the input path specified in the Spark job is not found.

4.       Out of memory: This error indicates that Spark has run out of memory while processing the job.

5.       IllegalArgumentException: This error occurs when one or more of the parameters passed to a Spark method are invalid.

6.       NoSuchMethodError: This error occurs when you are trying to call a method that does not exist in the Spark version you are using.

7.       ExecutorLostFailure: This error occurs when an executor node in the Spark cluster fails or is lost while processing the job.

8.       SparkException: This error message is a generic message that indicates that the Spark job failed due to an error.

9.       SparkException: This is a general exception that can occur for a variety of reasons, such as a configuration error or a problem with the Spark cluster.

10.   IllegalArgumentException: This error occurs when Spark encounters an invalid argument in the code, such as an incorrect input parameter or a missing configuration setting.

11.   NoSuchElementException: This error occurs when Spark cannot find an element in a collection or iterator.

12.   NullPointerException: This error occurs when Spark tries to use a null object reference, such as when attempting to access an object that has not been initialized.

13.   IOException: This error occurs when Spark encounters an issue reading or writing data, such as when a file is inaccessible or the Hadoop file system is down.

14.   Task failed while writing rows: This error can occur when Spark encounters a problem while writing data to an external data source, such as a database or file system.

15.   OutOfMemoryError: This error indicates that Spark has run out of memory while processing the data.

16.   ClassNotFoundException: This error occurs when Spark cannot find a class that is needed to execute the code, such as a missing dependency.


Featured Posts

Kali Linux Remote Desktop: Access GNOME from Windows Using Native RDP

  Kali Linux + GNOME 50 + GNOME Remote Desktop + Windows Remote Desktop (MSTSC) Getting a full GNOME desktop remotely on Kali Linux can be ...